sudo yum install -y httpd openscap-scanner openscap-utils scap-security-guideOverview
RHEL 8 makes it easy to maintain secure and compliant systems with OpenSCAP.
What is SCAP?
SCAP (Security Content Automation Protocol) is a NIST project that standardizes the language for describing assessment criteria and findings. It also provides a vulnerability rating system. The project’s home page is https://scap.nist.gov/
The essential components of SCAP are:
-
XCCDF: The Extensible Configuration Checklist Description Format, to describe security checklists
-
OVAL®: Open Vulnerability and Assessment Language, a declarative language for making logical assertions about the state of a system
-
CCE™: Common Configuration Enumeration
-
CPE™: Common Platform Enumeration
-
CVE®: Common Vulnerabilities and Exposures
-
CVSS: Common Vulnerability Scoring System
OpenSCAP is a project that implements tools for performing SCAP scans and remediating findings.
You can read more about the project at http://www.open-scap.org/ and the repository for their tools and profiles is on GitHub at https://github.com/OpenSCAP/openscap/.
Red Hat ships SCAP content in the SCAP security guide, but the content the OpenSCAP uses is under active development and latest versions of it can be found at: http://www.github.com/ComplianceAsCode. Red Hat also maintains security data feeds, including security advisories in OVAL format, at: https://access.redhat.com/security/data.
Exercise Description
In the following exercises we’ll use the CLI to show how you can validate system compliance. There are other tools as well, including a GUI utility and another for scanning container images.
Section 1: Ensure httpd and the OpenSCAP scanner are installed
Ensure Apache httpd plus the OpenSCAP scanner and definitions are installed with the command below; it’s safe to run even if the packages already exist:
The scap-security-guide package contains prepared system profiles for several RHEL releases and system types; they are installed under /usr/share/xml/scap/ssg/content.
You can get a summary of the profiles in a given definition file with the following command:
oscap info --fetch-remote-resources /usr/share/xml/scap/ssg/content/ssg-rhel8-ds.xmlOutput:
Document type: Source Data Stream
Imported: 2023-02-13T11:49:18

Stream: scap_org.open-scap_datastream_from_xccdf_ssg-rhel8-xccdf.xml
Generated: (null)
Version: 1.3
Checklists:
	Ref-Id: scap_org.open-scap_cref_ssg-rhel8-xccdf.xml
Downloading: https://access.redhat.com/security/data/oval/com.redhat.rhsa-RHEL8.xml.bz2 ... ok
		Status: draft
		Generated: 2023-02-13
		Resolved: true
		Profiles:
			Title: ANSSI-BP-028 (enhanced)
				Id: xccdf_org.ssgproject.content_profile_anssi_bp28_enhanced
			Title: ANSSI-BP-028 (high)
				Id: xccdf_org.ssgproject.content_profile_anssi_bp28_high
			Title: ANSSI-BP-028 (intermediary)
				Id: xccdf_org.ssgproject.content_profile_anssi_bp28_intermediary
			Title: ANSSI-BP-028 (minimal)
				Id: xccdf_org.ssgproject.content_profile_anssi_bp28_minimal
			Title: CIS Red Hat Enterprise Linux 8 Benchmark for Level 2 - Server
				Id: xccdf_org.ssgproject.content_profile_cis
			Title: CIS Red Hat Enterprise Linux 8 Benchmark for Level 1 - Server
				Id: xccdf_org.ssgproject.content_profile_cis_server_l1
			Title: CIS Red Hat Enterprise Linux 8 Benchmark for Level 1 - Workstation
				Id: xccdf_org.ssgproject.content_profile_cis_workstation_l1
			Title: CIS Red Hat Enterprise Linux 8 Benchmark for Level 2 - Workstation
				Id: xccdf_org.ssgproject.content_profile_cis_workstation_l2
			Title: Unclassified Information in Non-federal Information Systems and Organizations (NIST 800-171)
				Id: xccdf_org.ssgproject.content_profile_cui
			Title: Australian Cyber Security Centre (ACSC) Essential Eight
				Id: xccdf_org.ssgproject.content_profile_e8
			Title: Health Insurance Portability and Accountability Act (HIPAA)
				Id: xccdf_org.ssgproject.content_profile_hipaa
			Title: Australian Cyber Security Centre (ACSC) ISM Official
				Id: xccdf_org.ssgproject.content_profile_ism_o
			Title: Protection Profile for General Purpose Operating Systems
				Id: xccdf_org.ssgproject.content_profile_ospp
			Title: PCI-DSS v3.2.1 Control Baseline for Red Hat Enterprise Linux 8
				Id: xccdf_org.ssgproject.content_profile_pci-dss
			Title: DISA STIG for Red Hat Enterprise Linux 8
				Id: xccdf_org.ssgproject.content_profile_stig
			Title: DISA STIG with GUI for Red Hat Enterprise Linux 8
				Id: xccdf_org.ssgproject.content_profile_stig_gui
		Referenced check files:
			ssg-rhel8-oval.xml
				system: http://oval.mitre.org/XMLSchema/oval-definitions-5
			ssg-rhel8-ocil.xml
				system: http://scap.nist.gov/schema/ocil/2
			security-data-oval-com.redhat.rhsa-RHEL8.xml.bz2
				system: http://oval.mitre.org/XMLSchema/oval-definitions-5
Checks:
	Ref-Id: scap_org.open-scap_cref_ssg-rhel8-oval.xml
	Ref-Id: scap_org.open-scap_cref_ssg-rhel8-ocil.xml
	Ref-Id: scap_org.open-scap_cref_ssg-rhel8-cpe-oval.xml
	Ref-Id: scap_org.open-scap_cref_security-data-oval-com.redhat.rhsa-RHEL8.xml.bz2
Dictionaries:
	Ref-Id: scap_org.open-scap_cref_ssg-rhel8-cpe-dictionary.xml
Towards the bottom of the list, you can see profiles for PCI-DSS and another for OSPP. The OSPP profile is a general-purpose profile, so it’s a good choice for testing.
Section 2: Enable httpd for viewing compliance report
Run the following to enable the Apache web server and allow client access to it.
sudo firewall-cmd --permanent --zone=public --add-service=http
sudo systemctl reload firewalld
sudo systemctl enable --now httpd
Section 3: Perform an initial compliance scan
To perform a basic compliance scan using the OSPP profile for RHEL 8, run the following command; the profile is specified by supplying the Id field from the output above:
sudo oscap xccdf eval --fetch-remote-resources --profile xccdf_org.ssgproject.content_profile_ospp --results-arf /tmp/arf.xml --report /var/www/html/report.html /usr/share/xml/scap/ssg/content/ssg-rhel8-ds.xml| Issue under investigation: If the command above ends with a one line message saying "Killed", then the report will not generate. This can be remediated via a reboot until the root cause is found. |
The command above outputs the result of the compliance scan into an Asset Reporting Format (ARF) file, and generates a HTML-based report
Once the command completes, open this link in another tab to view the resulting report:
http://node-0.example.redhatgov.io/report.html
The FQDN in the URL above is an example. Yours will need to have the FQDN used to reach your host via the Cockpit Web Console, e.g. node-0.example.redhatgov.io
|
Here’s a snippet of what the report looks like:
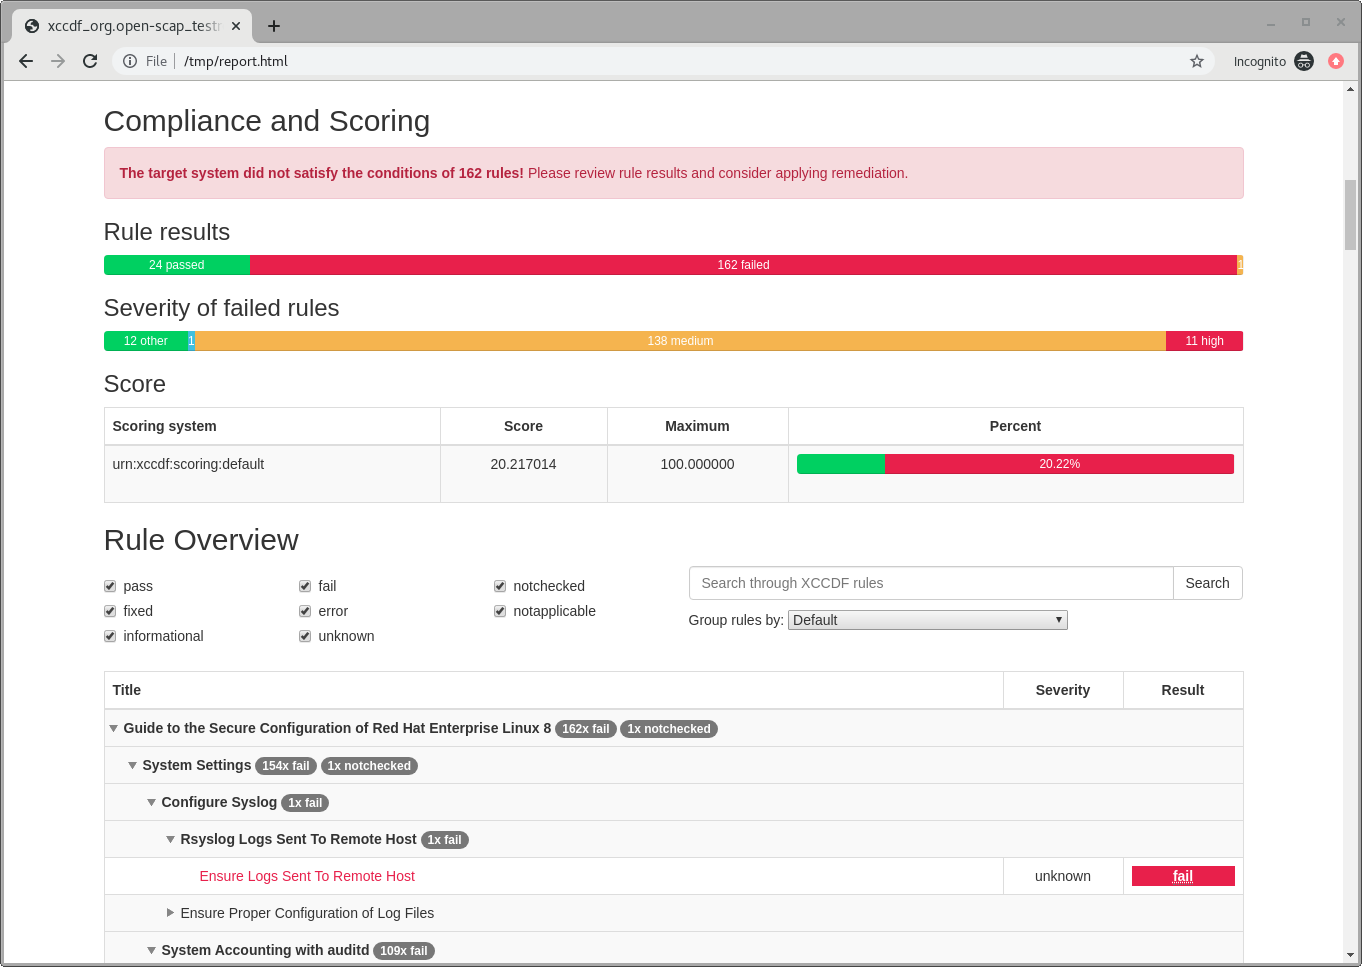
Figure 1: OpenSCAP report
Section 4: Automatically remediate findings
To correct compliance issues found in the scan, we can generate a Bash shell script or an Ansible playbook automatically from the scan’s findings. To generate an Ansible playbook, run the following:
sudo oscap xccdf generate fix --fetch-remote-resources --fix-type ansible --result-id "" /tmp/arf.xml > /tmp/ospp-playbook-fix.yml| The above example produces a tailored remediation playbook, but you can similarly generate a complete remediation playbook for any profile. For example, to create a playbook to apply the DISA STIG, you would run: sudo oscap xccdf generate fix --fetch-remote-resources --fix-type ansible --profile xccdf_org.ssgproject.content_profile_stig /usr/share/xml/scap/ssg/content/ssg-rhel8-ds.xml > /tmp/stig-playbook-fix.yml |
Review the generated YAML file, /tmp/ospp-playbook-fix.yml. Note that the individual tasks are clearly named and delineated. Once you’re comfortable with it, run the playbook with:
sudo ansible-playbook -i localhost, -c local /tmp/ospp-playbook-fix.ymlThe playbook will take several minutes to run.
Section 5: Review changes
To see what differences the application of the hardening profile has made, re-run OpenSCAP, in eval mode, as you did, before:
sudo oscap xccdf eval --fetch-remote-resources --profile xccdf_org.ssgproject.content_profile_ospp --results-arf /tmp/arf.xml --report /var/www/html/report.html /usr/share/xml/scap/ssg/content/ssg-rhel8-ds.xml| Issue under investigation: If the command above ends with a one line message saying "Killed", then the report will not generate. This can be remediated via a reboot until the root cause is found. |
Once the command completes, open this link in another tab to view the resulting report:
http://node-0.example.redhatgov.io/report.htmlYou may notice that the playbook may not have fixed every single issue found. This may be due to a specific check requiring a change to a configuration that cannot be corrected by Ansible or script, or requiring a fundamental system change (such as partitioning schemes).
×
Workshop Details
| Domain |
|
|
| Workshop | ||
| Student ID |
Workshop Details
| Domain |
|
|
| Workshop | ||
| Student ID |